ShopDreamUp AI ArtDreamUp
Forest Photography Tutorial
7 min read
Deviation Actions
Animals, Plants, & Nature Week
 Hello reader!
 I am Nelleke, and I was asked to write an article about forest photography. Which is my favorite subject of photography! There is something about them that is timeless. Of course there's a reason forests get used so much as a backdrop in stories and movies... They can give you the feeling something magical is waiting just around the corner.

In this article I will discuss several points, some a bit longer than others. They are Composition, Conditions, Equipment and Editing.
---
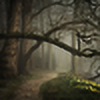
You might have seen a beautiful forest scene once, but noticed after taking a picture that it looks very different. A picture lacks the depth your eyes can see while walking in a forest. Which can result in a picture of just a flat bunch of trees. As you can see below. I took that photo seven years ago, when I was just starting to get into forest photography. I can assure you it looked a lot more magical in real life.

You have to compensate for the lack of 'automatic' depth. One way of doing so is through composition. Composition gives you the means to lead the viewer through your image. The first thing to do is chose a main subject. It could be a path, a clearing between trees, or an interesting looking branch or tree.

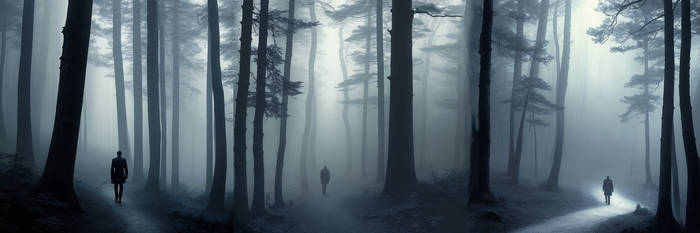
There should be as little as possible distracting from your main subject. See the photo below as an example.

It has all ingredients for a nice photo: Some fog, soft light pouring through the trees and a pretty reflection. Yet that isn't the first you see when you look at this photo. Other parts scream for attention. Like the dark parts of land and bush in the foreground, the bright sky and the over lit sun in the upper part of the picture. All not very interesting. Think about which parts of the scene attract you. Every object in your photo should add to that atmosphere. See whether your main object of interest looks better in the middle of your photo or somewhere else. Experiment.
In the case of the previous photo I walked a bit further to get a composition I liked. With more focus on the fog, light and reflection.

---
The conditions in which you take your photos are vital. Like every landscape, a forest looks different every minute due to light and weather. And the seasons give every part of the year a different atmosphere.
Below is an example of difference in light, weather and season. These photos are from the same location; however, the upper picture was taken on a summer evening and the lower picture on a morning in spring.

Different times of day make for different light. The closer to sunrise or sunset the warmer the light: The well known Golden Hour. The longer away from sunrise or sunset, the higher and brighter the sun will be.
The photo below was taken a couple of hours after sunrise, on a hazy morning. You can see it's not taken right after sunrise because of the angle of the rays.
In this article I will discuss several points, some a bit longer than others. They are Composition, Conditions, Equipment and Editing.
---
Composition
You might have seen a beautiful forest scene once, but noticed after taking a picture that it looks very different. A picture lacks the depth your eyes can see while walking in a forest. Which can result in a picture of just a flat bunch of trees. As you can see below. I took that photo seven years ago, when I was just starting to get into forest photography. I can assure you it looked a lot more magical in real life.
You have to compensate for the lack of 'automatic' depth. One way of doing so is through composition. Composition gives you the means to lead the viewer through your image. The first thing to do is chose a main subject. It could be a path, a clearing between trees, or an interesting looking branch or tree.
There should be as little as possible distracting from your main subject. See the photo below as an example.
It has all ingredients for a nice photo: Some fog, soft light pouring through the trees and a pretty reflection. Yet that isn't the first you see when you look at this photo. Other parts scream for attention. Like the dark parts of land and bush in the foreground, the bright sky and the over lit sun in the upper part of the picture. All not very interesting. Think about which parts of the scene attract you. Every object in your photo should add to that atmosphere. See whether your main object of interest looks better in the middle of your photo or somewhere else. Experiment.
In the case of the previous photo I walked a bit further to get a composition I liked. With more focus on the fog, light and reflection.
---
Conditions
The conditions in which you take your photos are vital. Like every landscape, a forest looks different every minute due to light and weather. And the seasons give every part of the year a different atmosphere.
Below is an example of difference in light, weather and season. These photos are from the same location; however, the upper picture was taken on a summer evening and the lower picture on a morning in spring.
Light
Different times of day make for different light. The closer to sunrise or sunset the warmer the light: The well known Golden Hour. The longer away from sunrise or sunset, the higher and brighter the sun will be.
The photo below was taken a couple of hours after sunrise, on a hazy morning. You can see it's not taken right after sunrise because of the angle of the rays.

Try to avoid bright light. Bright sun makes a photo chaotic. It lights everything very brightly and creates overlit sunspots everywhere screaming for attention. Like in the picture below I took six years ago:

Weather
Of course weather is also very important. Without special circumstances it's best to take forest photos on a cloudy day. This prevents distracting sunspots. I like taking pictures on foggy moments.

Season
Of course the season you photograph in also makes a big difference, as illustrated below. Every season has it's charm.

Don't get hung up on a place. A fantastic place does not necessary make a fantastic photo. With the wrong circumstances it can also just look very boring. Just like an average spot can look amazing with the right light and weather. Be flexible, and make the best out of the circumstances.
---
Equipment
You don't need an expensive camera to take forest photos. With the right circumstances and composition you can make an awesome forest photo with a simple camera. Don't forget to bring a tripod though, as it's often dark in the forest. A wide angle lens is handy to capture landscapes. I usually use an 18-105mm lens for my forests. But of course your lens depends on which part of the forest you intend to photograph.

---
Editing
Post-processing depends on your taste, and on the atmosphere you want to achieve. I try to emphasize and exaggerate the atmosphere in post-processing.
Lately I like to manually combine a darker and lighter version to get the exact contrast I want. Like I did in the image below. Left is the original, right the edited result.

I don't own Photoshop or Lightroom myself. I might get them in the future, but at the moment I'm not missing them yet. The programs I use are free to download. I use RawTherapee for the basic contrast and color editing, vignette and noise reduction. And The GIMP to combine layers and manually darken specific spots.
---
Thank you for reading, and have fun photographing trees!


Comments91
Join the community to add your comment. Already a deviant? Log In
Thank you for this tuto! Your pictures are awesome and I think it also need spending plenty of your time in the forest.![]()